Raspberry Pi
Outside access to an external hard drive by FTP
I always liked the idea of things like Google Drive. A place where I can store all my documents and photos and invoices and to-do lists that is always accessible from wherever I might be. But there is a very real danger with online cloud storage: you have no control over the machines that are storing your personal info.
Look at something like the now defunct Megaupload. Granted, many people used it as storage for files they may not have technically owned anyways, but it wasn’t solely a piracy haven. Near the end Megaupload was advertising that a bunch of Fortune 500 companies had premium Megaupload accounts.
What happened to all those documents and files after the raid, and subsequent takedown, of Megaupload? Last I heard, the majority were still in limbo. Some companies who hosted Megaupload servers are still holding on to the servers with their data intact at the request of the United States Government, in order to be used as evidence against Kim Dotcom. I have heard some other companies simply wiped the servers in order to sell them to new clients. Megaupload account holders do not have access to their files anymore.
Sure, one could argue that Google is legit and this would/could not happen to such a large company. But what does Google (or any other cloud hosting service) really do to protect our data and our privacy? Do they keep backups somewhere? Do they snoop our content? Are they vulnerable to hackers who are looking for nude celebrity pictures? What if there is a natural disaster at one of the server facilities?
This is where an important technology rule comes into play: always keep multiple backups! That USB on your keychain can easily be lost, the hard drive on your laptop may get corrupted, the cloud hosting service you trust might shut down and your home may get robbed. Keeping multiple backups in different locations ensures you will still have access to your valuable data in case anything should happen.
I still heavily rely on Google Drive for keeping my documents ready and up to date. But occasionally I like to back up those older, no longer needed documents to a 2TB hard drive I keep at home. So, what if I need easy access to an old word document or a picture? Not much harder than plugging in the hard drive to my laptop and grabbing what I need.
But like I said earlier, I like the convenience of having it accessible on the go. With that in mind, I set out to repurpose my Raspberry Pi. (Did I forget to mention I replaced it with an OUYA console? A Tegra 3 processor with Android beats the hell out of a Raspberry Pi as an HD media centre.) I envisioned a Google Drive copycat, where I could go to a URL, login, and be able to view and edit my documents. All while having them stored safely in my own home.
To achieve this I, surprisingly, was able to keep the latest Openelec image on the Raspberry Pi. I installed a fresh image, to make sure there were no lingering settings, preferences or files and set up my wifi connection during the set up.
What is great about Openelec is that it will auto-mount any external drives connected to it on boot by default, no need to worry about that. Next step was to assign the Raspberry Pi a static IP from the Openelec settings and then forward the appropriate ports on my router to the now static IP. Allowing your router to connect to the static IP is integral to connecting to the Raspberry Pi from anywhere in the world where you have internet access.
Openelec also has SFTP configured by default and for some use cases this could be all a person wants. But not me! I wanted Google Drive like access remember? I did some searching and found VSFTPD, which I installed to Openelec (how-to via http://matfrapp.blogspot.ca) so that it could open up direct FTP access on port 21.
There were some important bits of info in the comments, so if you are looking to implement this yourself, be sure to read through them! One in particular was necessary to get the whole system running: you will want to CHOWN the /storage/opt/vsftp folder and its contents. Then open vsftpd.conf and set “anonymous_enable” from yes to no. This is also important, unless you want your HDD open to anyone who knows the IP address to connect to. With that being done though, you will need to use the Openelec default username/password combination (usually root/openelec respectively).
Next I installed MonstaFTP on my server. My real server where I host my various websites for myself and clients as well as side projects like this, not the new one I am making with the Raspberry Pi. MonstaFTP is basically an FTP program wrapped up in website form. You can have a copy on your server and use it to connect to any FTP you know the details to. I modified my copy of it to be single purpose, only connecting to my HDD through my Raspberry Pi. So I hacked in the Openelec user/pass into the code and instead of a landing page requesting FTP details, I changed it to a landing page that requests simply a username and password. I made a few other modifications as well, pertaining to how files are viewed and edited. I also added ability for a few extra filetypes that do not come out of the box with MonstaFTP.
Now, I can login to my 2TB HDD from anywhere and browse, upload, download, view and edit all the files stored on there. So easy, I rarely even physically plug in to the HDD, regardless of the fact I am sitting right next to it!
Raspberry Pi
The WiFi
For the past week or so I have been using OpenELEC as the software on my Raspberry Pi. Not really any reason, just was testing it out and had everything configured so I just let it be. Didn’t feel like reinstalling all my addons and entering passwords. It runs quite well and I didn’t have any real complaints.
Until today.
I came home from work to find the USB WiFi adapter I purchased had arrived in the mail. Just so happens that earlier in the day I had done some research into using OpenElec with a WiFi adapter. I came up with mixed results. I was disappointed at the lack of information I could find regarding OpenELEC and the Realtek 8188CU chipset that my adapter would be using. However I was happy to find that the search terms “openelec wifi 8188cu” gave me 4 links to this very blog! Two are direct links to the blog (One at the Tumblr location and the other at my personal domain where the blog is powered using the Tumblr API). The other two are Tumblr search pages for tags of Raspberry Pi.
Anyways, back to the matter at hand. I found a few forums where people had problems with their adapters and fairly inconclusive solutions. I let it go and figured I would try for myself to see the results. After plugging in the adapter and going into the OpenELEC OS Settings, that comes pre installed with OpenELEC (under programs), I enterted the necessary information for my home network and rebooted the Pi. No internet. Verified everything was entered correctly and I didn’t fat-finger my password, rebooted again and still no internet access. I didn’t particularly feel like jumping through all kinds of hoops to get the adapter working so I decided to try with Raspbmc.
Raspbmc explicitly states that the Realtek 8188CU chipset has “support out of the box”. I had to wipe my SD card, run the Raspbmc installer, boot the Pi and let it do its thing. Once completed (and still using the wired connection) I installed the Network Manager addon, unplugged the ethernet cable and plugged in the WiFi adapter. Rebooted once more and navigated to the Network Manager addon and it auto scans for available Wifi networks. Success! It found my home connection and asked for the password and it is now saved and running smoothly.
I had to once again download my various addons and enter all passwords and OAuth keys but this time once everything was set I made a backup of my SD card using Win32DiskImager so that if my card corrupts or I decide to try OpenELEC or XBian, I could reinstall my custom image of Raspbmc and be up and running in under 10 minutes with all my preferences saved.
Note: I have noticed that Raspbmc locks up and essentially the Pi is frozen and needs a reboot. This happened a few times before I switched to OpenELEC and has happened once since reinstalling Raspbmc but never with OpenELEC. I will have to keep an eye out for this to see if I can isolate when it happens and if it will be a problem.
Raspberry Pi
Raspberry Pi
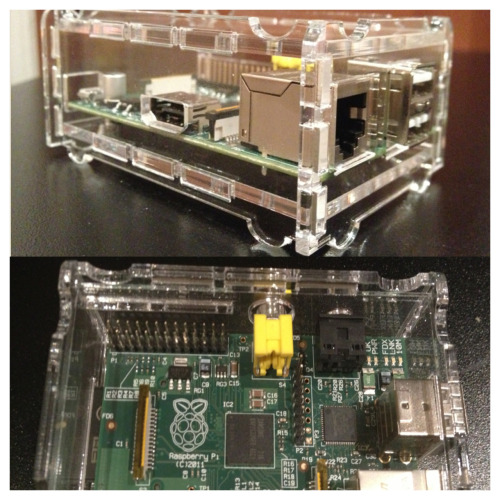
The Clear Case
Today I received my clear acrylic case in the mail! Saw it in the mailbox on my way out to work so I ran back in the house to get my Raspberry Pi so I could put it together while at work!
It looks awesome! All openings fit perfectly, the case snapped together tightly and once assembled seems extremely sturdy. My only worry at this point is that since the HDMI slot is pretty much flush with the edge of the board and the acrylic has a few millimeters of thickness, I am wondering if the HDMI cable will be able to be pushed in far enough to make a proper connection with the board. I will have to check that out and update this post later. However I am confident these cases have been thoroughly tested with multiple boards since this is a UK company manufacturing them and not just sloppily put together in China.
For now this case gets an A+ for manufacturing, ease of assembly, precision fit for the ports and overall cool factor. As a bonus these cases are stack-able for those who have more than one!
UPDATE: The HDMI plugs in without a problem. After a few days of usage the case is holding up well and I am very satisfied with it.
Raspberry Pi
The Remote
So I managed to get my LG remote working with the Raspberry pi by modifying my remote.xml file in XBMC. I had to remap my Previous/Next buttons on the remote to work as Back/Menu buttons instead. This seemed the most sensible approach since my use of previous/next is mostly limited to rewind/fastforward and this same function can be achieved with the left/right directional arrows on the remote. Essentially the previous/next buttons were useless! Now keep in mind these changes were specific to my particular Lg tv model. It seems newer models dont have the back button issue so normally the remote would work out of the box.
I also remapped by pause button to bring you all the way back to the home menu, except when your in fullscreen video/music (then it actually pauses the media). Also made the previous button bring up the power menu when in the home screen (since there is no menu to back out of anyways) and the next button brings up the favourites menu when in home screen. These 2 menus are accessible from the home screen anyway if you navigate to the little icons but a button for them makes just that much easier to access.